Douglas B. Holmes |
Computer Program
|
Automated_dsn © 2000 - 2003 Douglas B. Holmes By Douglas B. Holmes Description The Automated Diffusion Notation System (automated_dns) was created to show the location of component loudspeakers in a performance space and notate each individuals scaled level as it changes over time. The progression of gesture changes is synchronized to the sound source. The placement of each (up to 16 speakers/tracks) can be specified and a sequence of fader movement (synchronized to the internal or external CD player) can be recorded and auditioned. The system was developed to show, accurately, the fader movements needed to recreate sound diffusion gestures in real-time. As a post recording tool, the composer and/or engineer can use this program to describe a space, and over time notate fader gestures that are synchronized to the audio source. And in the studio complex fader gestures can be described. In this way an engineer/composer can recreate these composed gestures and perform more precisely the intentions of the engineer/composer. The program may also be utilized to send the stored fader progressions to a midi controllable mixing board. Up to 32 fader channels on an automated mixing console can be utilized and controlled by sequence for performance by this program, so, it is useful for recording and engineering as well as a performance tool. The fader movement can be controlled using a midi fader controller. The midi input is hardwired, but the midi output can be configured. The program was created with access to a Mackie Ultra 34 Automated board (ultra 32) so the defaults are set for that machine. If you have some other brand of automated mixing console it would be advisable to send the manuals, equipment or bring me there; I would probably set you up with a program that works with your stuff. Circles
with a distinguishing symbols printed inside represent the speakers/fader
association. The circles and symbols change color with the recorded midi
fader levels (0-126) which are scaled and mapped for the notation processes.
A radiation mode can be chosen, and the speaker symbols will radiate color
to enhance the notation factor. The output audio will default to the built
in DAC on the Macintosh, but the user can choose to utilize an Audiomedia
III card. When an Audiomedia III card is used a stereo audio file can be
chosen as the output signal, however, an audio CD must still be placed
in the machine. With the correct equipment the output can support multiple
track output from aiff files (write if you are interested).
Minimum Requirements: 120Mhz Power Macintosh, running system 7.5.1 and up with OMS (it will crawl).
One second of silence recorded before work (necessary for timing issues). The first track will be the default starting point, so, the intended work should be the first track.Written using Opcode MAX. Installation 1. Place the Automated_dns
Folder on your hard drive.
The status window will show the files that are being loaded. After the program is running an "about program" is displayed. Click "thanks doug" and it will close. A menu bar at the top of the screen will be useful when navigating this program. Windows can be opened with short cuts. Menu Bar (pull down)
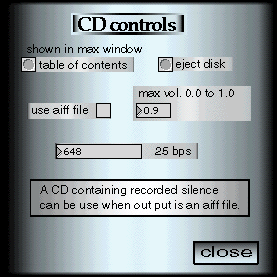
Audio CD and Aiff files The fader positions/colored symbols are synchronized to the timing blocks of an audio CD. The fader positions are time stamped with a maximum resolution of 25 BPS (40 ms). It is necessary to record or have one second of silence at the beginning of the work (prepend the one second segment, this is necessary to decrease timing errors at the start of the sequence). Therefore, the Aiff file and the CD must contain the same-recorded silence. When an Aiff file is used the timing is still taken from the CD because continuous tracking assets of the internal drive so an audio CD must remain in the drive even though the output may be an Aiff file. File Storage
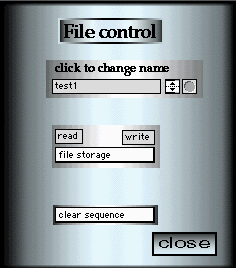
File Storage need to be addressed and stressed. The program reads and stores the individual text files used to set the program and to synchronize the fader movements to the audio source (CD). File management is important, especially if the program is being used for many works in sequence (concert setting). The title of the work (or a shorter continuous character name) should be used to distinguish works from one another others. The program adds appendices to the chosen name/title specified to save and read the necessary files. The chosen name, that represents a group of file, is displayed in the file section of the master controller. When save or open is chosen the program adds appendices like ".a1c" and ".pla" and the files are saved to the disk in the Automated _dns Folder. If an AIFF file is to be used, the file must be labeled "name/title.aif" (dot aif is appended to the chosen label). A file is saved for each of the speakers available in the placement window. All of the possible sequences (16) and the placement window information are written to disk when save all is chosen. It is also possible to save, clear, and load individual files using the file storage window. Placement Window
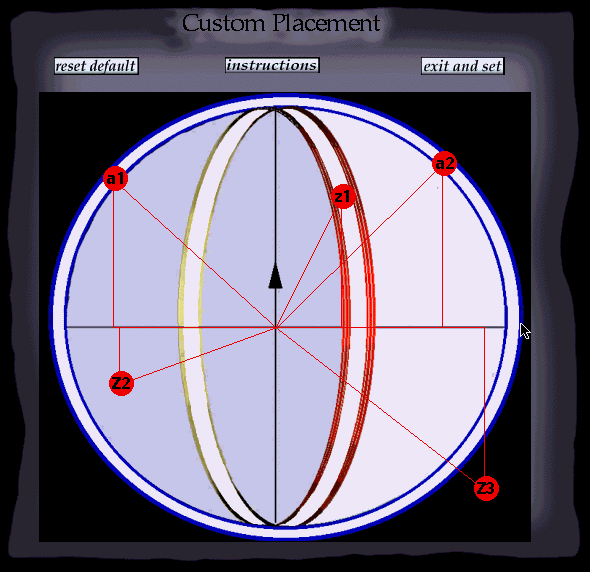
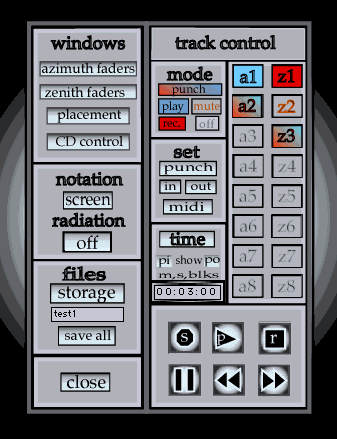
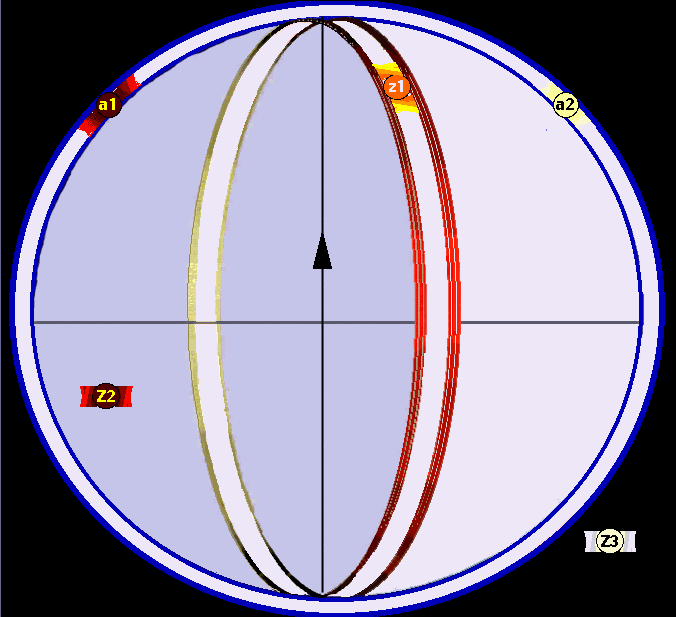
Quick placement instructions 1. Open Placement WindowThe placement window is used to describe the speaker arrangement in a listening space. Two rings are used to describe space in this window. An azimuth (horizontal) circle and a zenith (vertical) ellipse are to be used to represent space on the placement screen. Placement of eight speakers can be made on each ring. The azimuth and zenith rings describe the space surrounding the listener. Symbols are used to represent each speaker in the sound system and are placed by clicking on the screen and pressing keys associated with a track. After clicking on the screen a triangle is drawn from the x-axis to the spot that was clicked. Once the proper key(s) has (have) been depressed a small circle will be drawn on the screen. A symbol is printed in the circle describing the speaker/fader association. The coeordince and settings are not initiated until the "exit and set" button is clicked. Speaker/track symbols can be re-placed until the information is "set". Once a speaker/track in placed it will remain in the settings unless the "reset" is pressed. This will cause the window to default to zero speakers set. After the "exit and set" has been initiated the corresponding track buttons on the master controller will become active (blue), and in the Notation Screen the circle/symbols will be drawn. Setting does not save the configuration to disk. In notation mode (on the Notation Screen), the azimuth symbols are restricted and drawn in the azimuth ring (even if you place the circle/symbol outside of the ring representing the horizontal position. The symbol is drawn in the white portion of the azimuth ring on the Notation Screen. The radiation function, when engaged will also travel on the white portion of the azimuth circle on the Notation Screen. The placement of the zenith symbols is less restrictive. Placement outside of the zenith ellipse is possible when special keystrokes are used. When a "z" symbols is placed on the ellipse the notation radiation will travel on the white portion of the zenith ring. When the symbol is placed outside the ellipse, and the proper keystrokes are used, the symbol will be drawn at the clicked location. The radiation will, however, travel horizontal to the speaker symbol on the notation screen. Master Track Controller
Quick Tack Buttons on the Master Track Controller:
Blue: Active track in play mode. User fader input is disabled when the audio in engaged, midi, symbol color, and fader level are synchronized to the internal CD. Orange Symbol and gray background: Mute mode on the Master Controller (note a mixing board mute is available in the Fader Windows) causes the sequence file to be disengaged and the input control of the fader levels are given to the user for immediate audition (practice). ("m" key+click) Red: Record mode. The record mode time-stamps the user gesture changes. If you record over a previously recorded segment of a sequence you will get some strange values. Gradient (red-blue): Punch mode. Changes from play mode to record mode during the restraints of the punch in and out times. Records at higher resolution to insure time-stamps for that period are rewritten. ("p" key+click) Record mode: If a previously recorded segment of a sequence is record over you will get some strange values. This is because the previous gesture sequence will not be rewritten unless the time-stamp matches the existing stamp. At a possible 25 times a second, chances are that there will be some time-stamps that are not rewritten causing extraneous data to be present in the file. It is best to clear the track sequence file before recording. As long as time-stamped information is not present this is an efficient way of collecting value changes over time. The sequence can be edited in a text editor so changes can be made. For instance, a chunk of time stamped information can be removed and then for that duration new information can be recorded in the void time span.
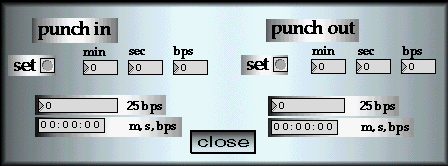
Punch Mode: When this is chosen, the track will play from the current start time to the pinch in setting in play mode. At the specified punch in setting the track will switch into high-resolution recording mode. The recording mode will continue until it reaches the punch out time at which point the track will return to play mode. During the punch time (in punch mode) the fader information being recorded will be at a higher resolution. This is done to insure that old time-stamped data is written over. Extensive use of punch will cause the files to grow. Use the punch to edit small time frames as to not under-mind the data reduction format of the files. You can edit the files with a text editor and reread the new edited files. CD or sound file navigation controls: the play, stop, fastforward, rewind, pause, record work like you would think they would. If the time numbers are clicked on the time position of the audio will be set back to what ever has been set in The start time window. Window navigation: The center and left hand side of the controller has navigational buttons such as "Storage" or "MIDI" that when pressed reveal window that have adjustable settings. Other buttons like "IN" and "OUT," in the set segment of the center section of the master controller, cause the visible counter time to be set without opening the window.
This is where the time-varying color changes are shown. The circle-symbols are redrawn each time a fader change is made in any of the active channels. The color of the entire circle changes depending on the fader position. The symbol itself also changes color but a different color scheme is utilized to enhance the notation of fader position around the unity level. If the radiation button is activated on the master controller the notation quality of the symbols are enhanced further by the radiation of level color in a cooling staged fashion. Press the arrow on the center of the diagram to refresh the Notation Screen and display all active track/symbols. Full screen will blacken the screen (use key commands to call tool windows). Extended automation (17-32)
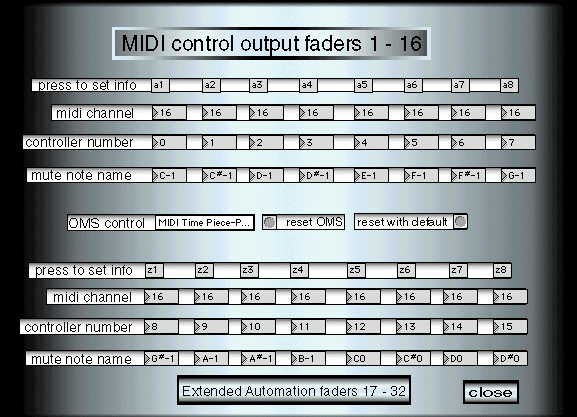
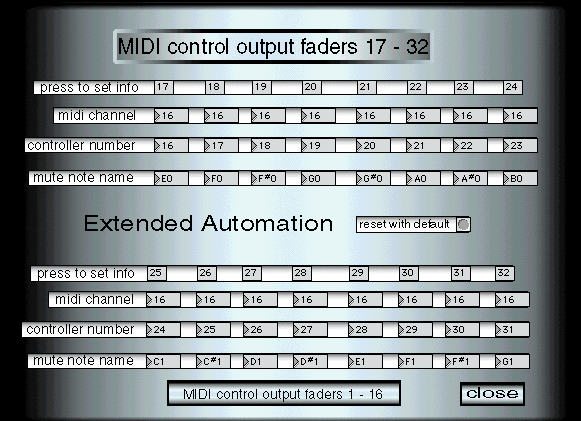
Extended Automation is used when more than 16 tracks/faders are necessary. Up to 32 controller tracks of midi data can be output. Speaker symbols 17 to 32 are shown in the Extended Automation window. These symbols are not placed in a space descriptive manor and lack the radiation of the primary azimuth and zenith symbols. By first recording up to 16 tracks, then naming, saving and then changing the appendices of up to 16 files the extended tracks will function when the Extended Automation Window is visible. When the appendix ".a1c" is changed to ".17c" the first speaker sequence will be available as the 17 Th. The track sequence will control midi functions of up to 32 output controller values simultaneously. Azimuth Faders and Zenith Faders
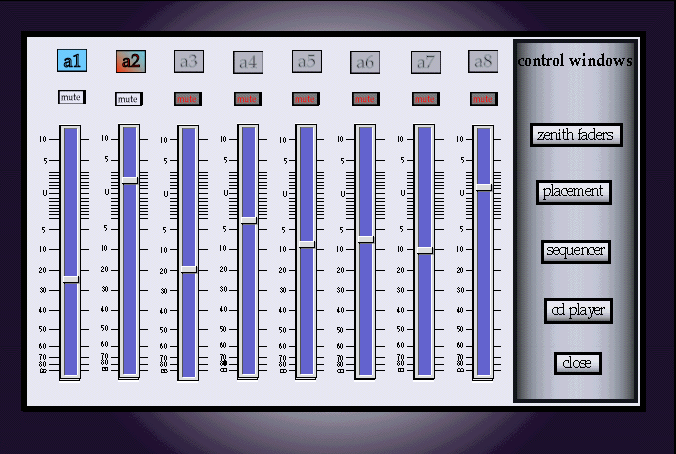
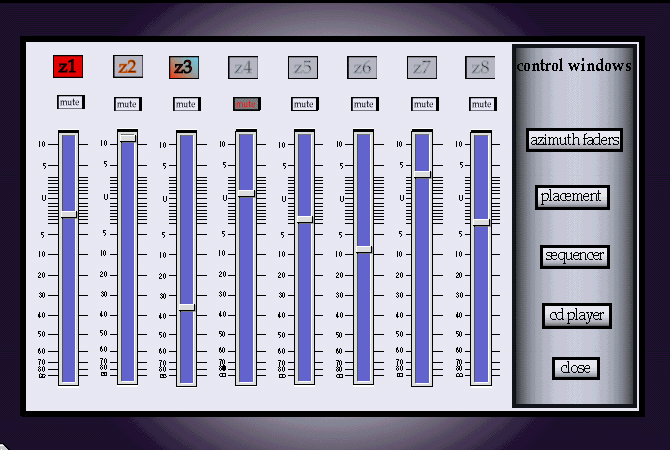
The faders are useful when a midi controller is not available. They also move with the sequence or midi controller input. The colored square symbol at the top of each fader will change as to the setting from the Master Track Controller, but will not function as buttons them selves. The Mute button on each of the fader windows is special. Unlike the mute in the Master Track Controller the mute button here actually mutes the channel associated with the track on the MIDI mixer (Mackie Ultra 34). When the mute is engaged the channel on the mixing board will go into mute mode, yet the sequence and notation functions of this program will continue to function. MIDI Windows
The Midi output setting is available from the Menu bar and the master controller. In these windows settings for OMS Midi controllers and individual track controller routing can be changed. The system defaults to the second set of input and output connections (midi cable) on the midi interface. These settings are useful but at this point are not recallable, so, any adjustment must be remade each time the program is restarted. CD window
The CD window houses several controls. The time in this window is shown in 25 BPS which corresponds and useful when editing track sequences in a text editor. Max Vol: The audio output has an envelope imposed upon it and the maximum value can be set from 0.0 to 1.0. When checked, the "use Aiff file" will cause the output of sound to be that of an Aiff file. An Aiff file (use ".aif" appendices) must be in the root folder path and an audio CD must still be in the internal CD drive of the computer for this to work. It is important to use a copy of the work with identical timings to the CD copy (including the recorded one-second of silence preceding the work). The output signal will utilize the internal DAC unless an Audiomedia III card is installed. Time window
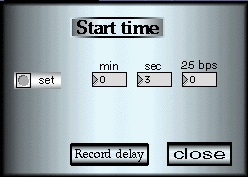
Use this
window to choose a start default time then press set. Timing is set to
default at three seconds. This interval is equal to 2 seconds of silence
(standard with the first track when burning a CD) and one second of recorded
silence and represents the start of the work. At the bottom of the window
a button can be used to access a record delay window.
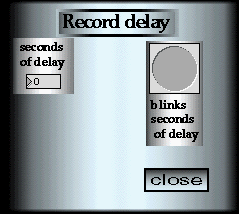
Record Delay Window
The record delay window is useful when using the graphic faders. Because of screen draw time, a delay can be used to change windows in plenty of time to record good data. This is also nice when reaching for equipment after hitting the record button. This function just delays the onset of record. Punch Window
Use this window to set the punch in and out times used for triggering punch record in punch mode. These times can also be set by clicking the "IN" and OUT" buttons at the desired points on the Master Controller. Shorter punch record duration is preferable. File Paths When save is used the files are saved in the "Automated_dsn Folder". These files can be moved into any of the supplied folders and the program will be able to find them when read/open is used. The easiest way to work is to leave the files in the root folder ("Automated_dsn Folder") and move them to one of the supplied folders once an acceptable mix has been achieved. There are a possible 34 files than need to be read so when multiple pieces are being performed care is needed to assure files are not misplaced. The files themselves are easily edited in a text editor like BB Edit. The fader positions are stamped to the time pulse of 25 blocks per second. Windows The placement of the windows can be moved each time the program is run by clicking in the bottom right hand corner of the window. Use the close button when closing the window and the window each time it is called will reaper in the new position without the bulky title bar. More Stuff With the correct instruction it is possible to change some of the settings in the program. There are adjustments for such settings as the line segment initiation that is used to smooth out the controller resolutions sent for Midi automation. If you use this program for performance please tell me how it went. Any questions or statements should be directed to Douglas@fmipro.com or write: |